
Blog
Lederhosen Sewing Pattern – Complete DIY Guide with Measurements

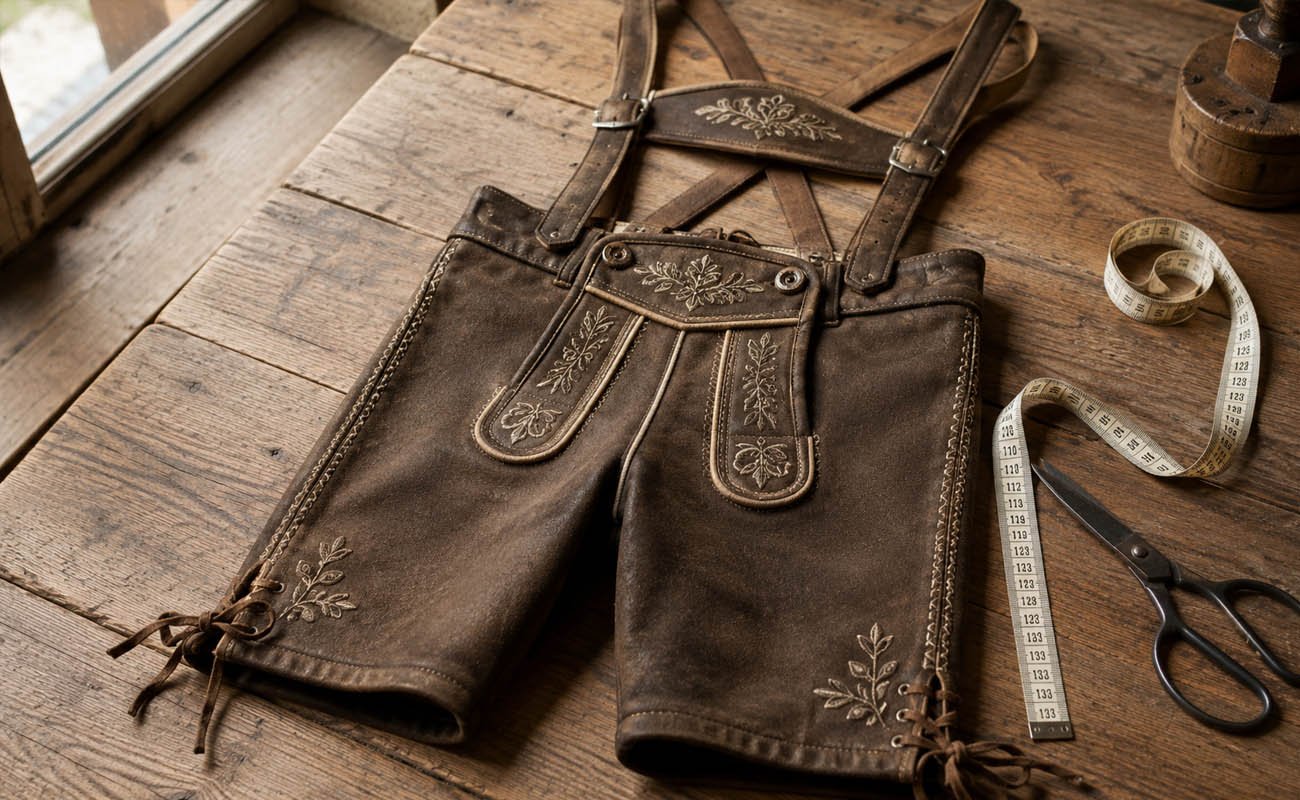
I made my first pair of lederhosen for a friend’s “Bavarian night” party, mostly because I didn’t want to spend $200 on something I’d wear once a year. It took me a whole Saturday, a ruined first attempt at the bib panel, and a lot of unpicking — but the second pair came out looking genuinely close to the real thing. This guide is everything I wish someone had told me before I started: the actual measurements, the mistakes that waste fabric, and the small details that make the difference between “costume” and “authentic.”
Who this is for: hobby sewists, Oktoberfest costume-makers, folk-dance and theater groups, and anyone who’s tired of paying retail prices for something they could make themselves with a weekend and a sewing machine.
Quick Overview
- Lederhosen are traditional Bavarian leather shorts built from a front bib, back panel, two leg pieces, and a pair of adjustable suspenders (called Träger in German).
- You don’t need a specialty leather machine — genuine leather, faux suede, and heavy cotton twill all work, provided you use the right needle and thread for each.
- Plan on 1.5–2 meters of fabric for an adult pattern, though this shifts depending on your waist, hip, and inseam.
- The decorative top-stitching and embroidery on the bib and side seams are what actually sell the look — skip these and it just reads as “leather shorts.”
- Budget a full weekend if it’s your first attempt. Realistically 6–10 hours of hands-on sewing, plus drying time if you’re using fabric glue anywhere.
What Lederhosen Actually Are (and Why Anyone Still Sews Them)
Lederhosen are short or knee-length leather trousers that come out of the alpine regions of Bavaria and Austria. They’re worn with a bib front, crossed suspenders, and usually some hand-stitched detailing that varies by region — if you want the full backstory, our what are lederhosen article goes into more of the history.
Here’s the honest math on why people still bother sewing their own: a decent ready-made pair runs $150 to $300, more if it’s genuine deerskin. Specialty retailers like Bavarian Attire sell finished pairs if you’d rather skip all of this, and there’s no shame in that — but if you sew your own, you control the fit, the fabric, and the budget, and you end up with something that actually matches your body instead of a generic size chart. That last part matters more than people expect, especially if you’re not a “standard” size in the first place.
What You’ll Need Before You Cut Anything
Choosing Your Fabric
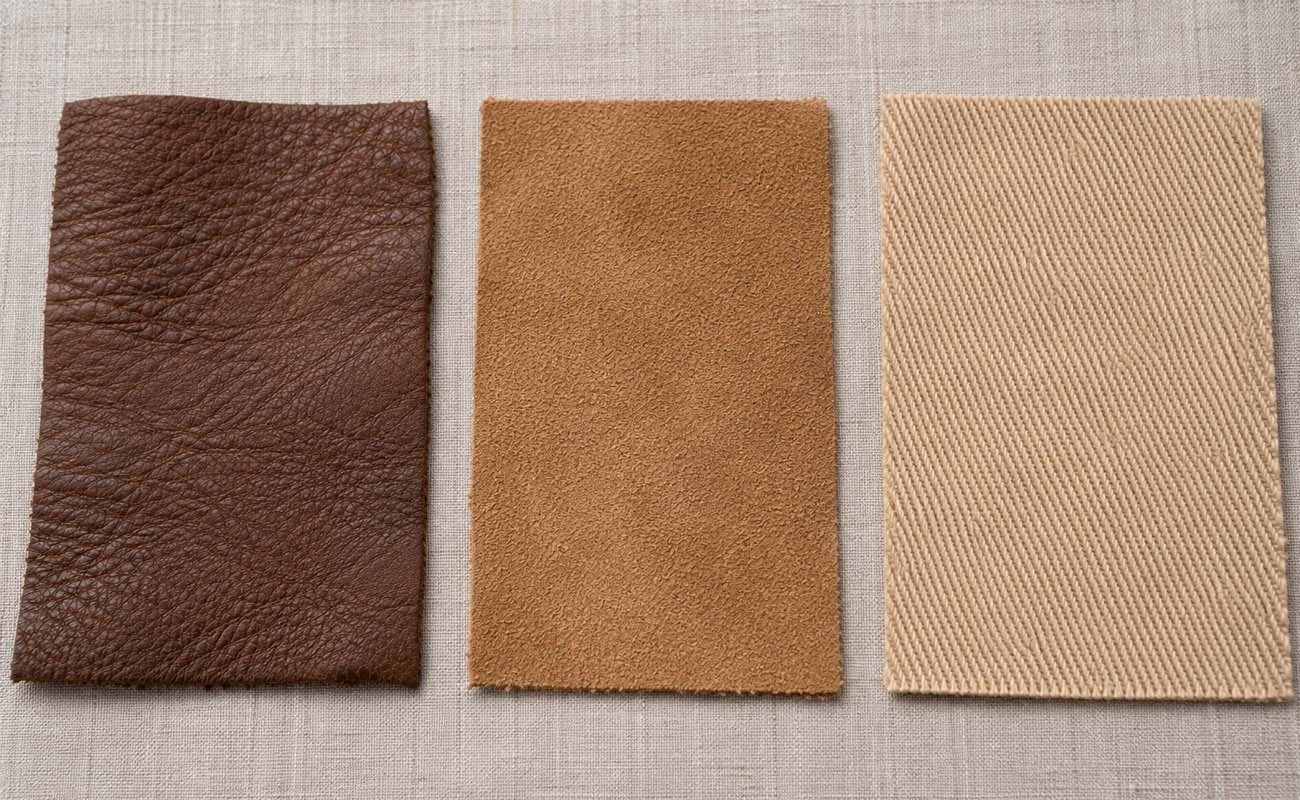
This is where most first attempts go wrong — people either grab fabric that’s too stiff to sew comfortably or too flimsy to hold its shape.
| Material | Look & Feel | Skill Level | Rough Cost |
| Genuine deerskin/goat leather | Most authentic, soft natural drape | Advanced | High |
| Faux suede / synthetic leather | Very close visual match, much easier to handle | Beginner–Intermediate | Medium |
| Heavy cotton twill or canvas | Good for stage/costume use, breathable | Beginner | Low |
If it’s your first time sewing anything leather-adjacent, start with faux suede. It doesn’t fray at the edges, it runs through an ordinary home machine without a fight, and it takes top-stitching well — which genuine leather sometimes doesn’t if your machine isn’t heavy-duty. If you end up pairing your shorts with a checked shirt or vest, it’s worth knowing the difference between the two most common patterns — we cover that in gingham vs plaid fabric patterns.
Tools You Actually Need
- A leather or heavy-duty needle (90/14 or 100/16 — a standard needle will skip stitches or snap on anything thicker than quilting cotton)
- Polyester or nylon thread — cotton thread just isn’t strong enough for structural seams that take real stress
- Fabric glue or double-sided tape, because pins leave permanent holes in real leather (learned this one the hard way)
- Sharp shears, ideally a rotary cutter too if you have one
- Metal suspender clips or leather buckle hardware
- Embroidery thread if you’re doing the decorative bib work — optional, but it’s genuinely what makes people say “wait, did you actually make that?”
Getting Your Measurements Right
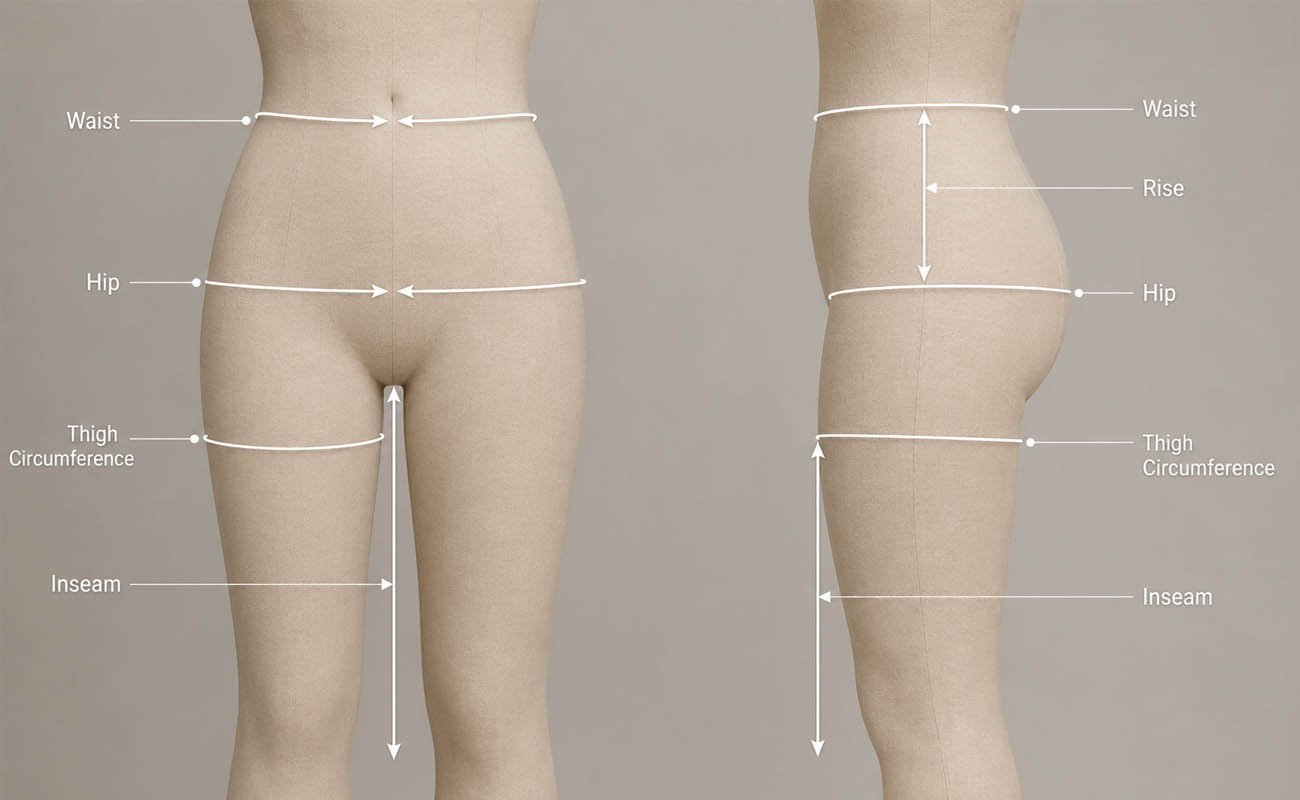
This part is tedious but skipping it is how you end up with shorts that look fine on a hanger and terrible on a body. Take these five measurements before you touch scissors:
- Waist — at your natural waistline, roughly where the shorts will actually sit.
- Hip — around the fullest part of your hips and seat.
- Inseam — from the crotch down to wherever you want the hem (traditional lederhosen hit just above or right at the knee).
- Rise — waistband to crotch seam, both front and back, since they’re not usually the same.
- Thigh circumference — fullest part of the upper thigh, which determines how wide the leg pieces need to be.
One thing that tripped me up the first time: add roughly 1–1.5 cm of seam allowance to every single measurement, and then another 2–3 cm of ease around the waist and hips if you’re working with leather or twill. Neither of those fabrics stretch the way denim or a cotton blend does, so if you cut to your exact measurement, sitting down becomes genuinely uncomfortable.
Rough Size Reference
| Size | Waist (cm) | Hip (cm) | Inseam (cm) |
| Small | 76–81 | 91–96 | 46 |
| Medium | 86–91 | 101–106 | 48 |
| Large | 96–101 | 111–116 | 50 |
| X-Large | 106–111 | 121–126 | 52 |
Treat this as a starting point, not gospel — always check it against your own body. And if your measurements sit outside these ranges, don’t just scale the pattern proportionally and hope; our guide on big and tall lederhosen sizes walks through what actually needs adjusting.
Drafting the Pattern Pieces
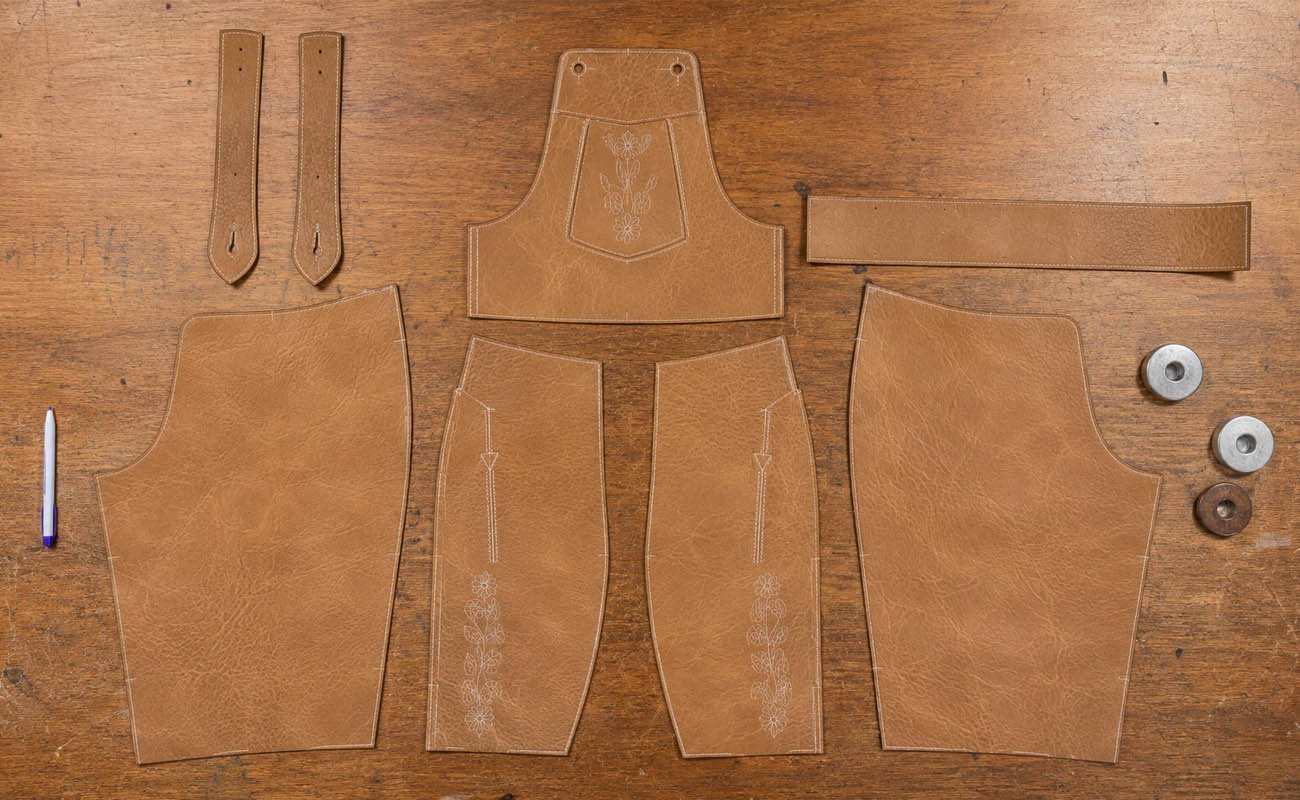
A traditional lederhosen pattern comes down to six pieces:
- Front bib panel — the decorative chest piece that connects to the suspenders.
- Left and right front leg panels — with a slight curve at the crotch, not a straight line.
- Left and right back panels — cut with a slightly higher rise than the front, otherwise sitting down is miserable.
- Waistband — a fitted strip, often with side lacing or buckle tabs so it can be adjusted later.
- Suspender straps (Träger) — two long strips, typically crossed in an X or shaped like an H at the back.
- Side flap or pocket trim — optional, but it’s a nice traditional touch if you want to go further.
Cutting, Step by Step
- Start with the front and back leg panels, using your hip and inseam numbers as the base width and length.
- Cut a curved crotch seam — steeper on the back piece, gentler on the front. A straight seam here is the single most common beginner mistake.
- Cut the bib as a trapezoid — wider up top at the chest, narrowing down toward where it meets the waistband.
- Cut two suspender strips, about 4–5 cm wide, long enough to run from the back waistband over the shoulder to the front bib. Measure this over your actual shoulder rather than guessing — everyone’s torso length is different.
- Cut the waistband on the straight grain. This matters more with twill than leather, since twill can warp if cut off-grain.
Actually Sewing It Together
Step 1: The Leg Panels
Sew the front and back leg panels together at the side seams and inseam, right sides facing each other. Use a slightly longer stitch — 3 to 3.5mm — for leather or faux suede. A short, tight stitch perforates the material along a line and weakens it, which is the opposite of what you want in a seam that’s going to take stress every time you sit down.
Step 2: The Waistband
Pin the waistband on if you’re using twill, or glue it in place if you’re working with leather (again — pins are permanent in leather). Line up the center front and center back marks carefully, then stitch with a double row of top-stitching. This isn’t just for durability; that double row is part of the classic lederhosen look.
Step 3: The Bib
Hem the raw edges first, then center the bib on the front of the waistband. Here’s a detail a lot of first-timers get wrong: traditional bibs are only stitched down at the bottom edge. The top is left loose, so it sits slightly away from the body instead of lying flat — that’s not a mistake, it’s the actual authentic silhouette. If you want to see exactly what that should look like before you commit to it, check what does lederhosen look like.
Step 4: The Suspenders
Attach one end of each strap to the back waistband and the other to the top corners of the bib, using metal buckles or leather adjusters so the length can change later. Most traditional designs cross the straps into an X, or shape them into an H at the back — either works, it’s mostly a matter of preference.
Step 5: The Detail Work
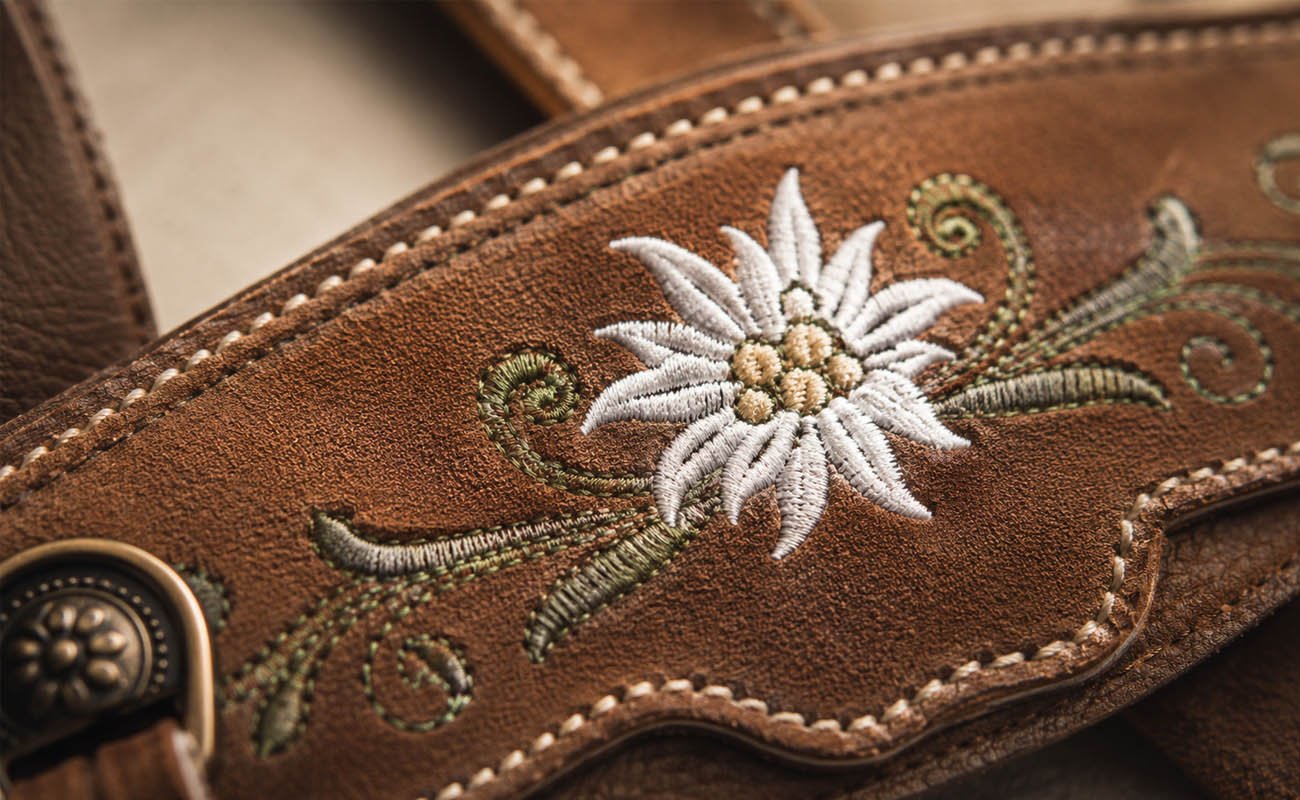
This is the step people skip when they’re rushing, and it’s the one that actually matters most for how the finished piece reads. Use a contrasting thread — cream, green, or brown are the traditional choices — to top-stitch along the side seams, pocket edges, and the outline of the bib. If you want to go all the way, hand-embroider a small edelweiss flower or oak-leaf motif on the bib. It takes maybe twenty extra minutes and it’s the single detail that makes people think you bought it somewhere expensive.
Step 6: Finishing
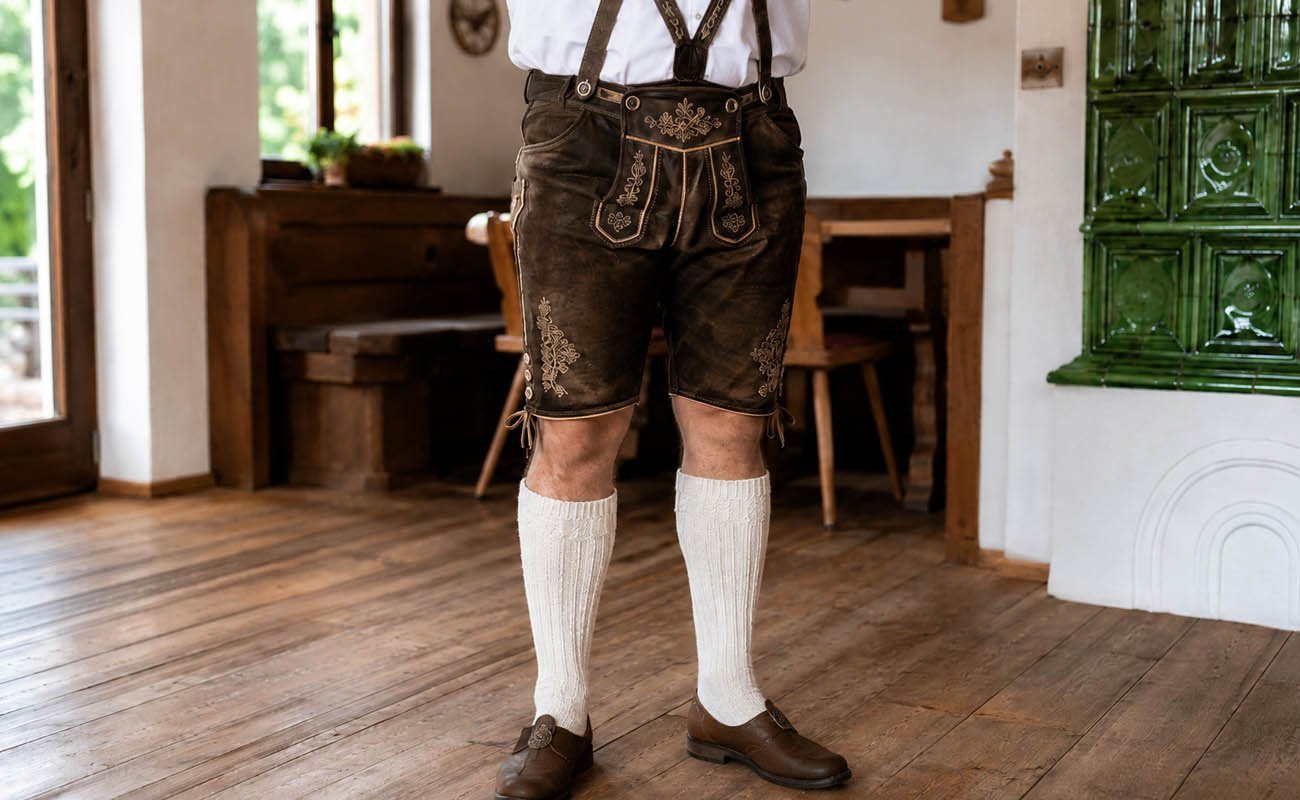
Hem the leg openings, attach any side buttons or lacing, and press the seams — low heat, dry iron, and a pressing cloth if you’re working with synthetic leather, since high heat will genuinely melt it (ask me how I know). Once it’s done, the last piece of the outfit is footwear, and it’s worth getting right — our guide on shoes to wear with lederhosen covers what actually pairs well.
Mistakes Worth Avoiding
- Skipping the ease allowance. Leather and twill don’t stretch, so a snug-fitting pattern becomes uncomfortable fast, especially sitting down for hours at a table.
- Using a regular needle on leather. It’ll skip stitches or snap outright. Size up, always.
- Pinning genuine leather. The holes don’t close back up. Use clips, glue, or tape instead.
- Ironing synthetic leather directly. Use a pressing cloth or you risk melting it in seconds.
- Cutting a straight crotch seam instead of a curved one. This is the difference between a comfortable fit and something that looks boxy and feels worse.
Frequently Asked Questions
How much fabric do I actually need for a lederhosen sewing pattern?
For an adult medium, plan on 1.5–2 meters (roughly 1.6–2.2 yards), with a bit extra if your fabric is narrower than 140 cm wide or if you’re adding pocket trim.
Can I sew lederhosen without a specialty leather machine?
Yes — a standard home machine handles faux suede, synthetic leather, and heavy twill fine, as long as it’s fitted with a leather or heavy-duty needle and polyester thread. Genuine thick leather is the one case where a walking-foot machine really does make life easier.
Can I sew lederhosen without a specialty leather machine?
Yes — a standard home machine handles faux suede, synthetic leather, and heavy twill fine, as long as it’s fitted with a leather or heavy-duty needle and polyester thread. Genuine thick leather is the one case where a walking-foot machine really does make life easier.
How long should lederhosen actually be?
Classic Bavarian styles end just above or right at the knee (kurze or kniebund). Ankle-length versions exist too, but those lean more formal and older-style than what most people wear to Oktoberfest.
How do I make the suspenders adjustable instead of fixed?
Use metal slide buckles or leather strap adjusters where the straps meet the back waistband. That way length can change without unpicking and re-sewing anything.
Is faux leather actually good enough, or does it look cheap?
Honestly, from a normal conversational distance, faux suede holds up well. It’s easier to sew, cheaper, and for costume or occasional wear it’s a completely reasonable substitute for the real thing.
Wrapping Up
Sewing your own lederhosen really comes down to three things: getting your measurements right, choosing fabric that matches your skill level, and not skipping the details — the bib shape, the crossed suspenders, the top-stitching — that make it read as authentic rather than a costume-shop version.
If you’re starting this weekend, cut your measurements first, pick your fabric, and start with the front bib panel — it’s the most forgiving piece to practice on before you touch anything that has to fit precisely. And if you’re sewing for the whole household, our DIY dirndl guide covers the matching women’s outfit, so nobody in the group is showing up in jeans.
